Explore the different types of threads used in manufacturing operations. This helpful article aims to assist you in creating threads efficiently, ultimately reducing lead times and costs for your next CNC machining project.
There exist numerous variations of threads utilized in CNC machining, each possessing its unique set of design principles and precision standards. It is crucial to comprehend the various types of threads and their integration into your designs and end products. It is not an overstatement to emphasize that the accuracy of threads can significantly impact the success or failure of final assemblies.
This article provides useful details on the process of creating threads through CNC machining.
Table of Contents
What’s the difference between external and internal threading?
Screws and bolts
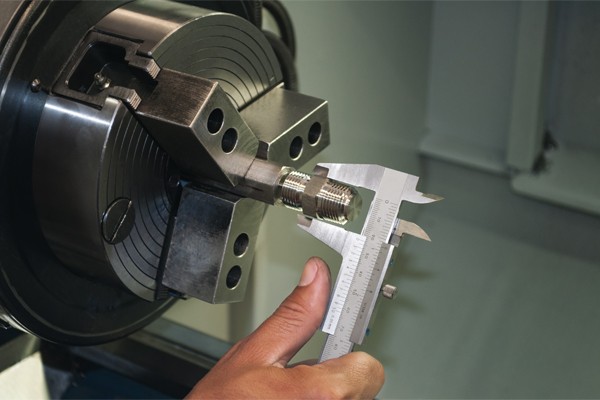
Allow us to briefly divert our attention to address this essential distinction. Screws and bolts feature external threading, whereas internal threads are present within the component you are creating and producing. Internal threads secure the threads from screws and bolts (external).It is crucial to have the ability to distinguish between external and internal threading in your technical drawing.
What are the main parameters for indicating threads?
thread profiles
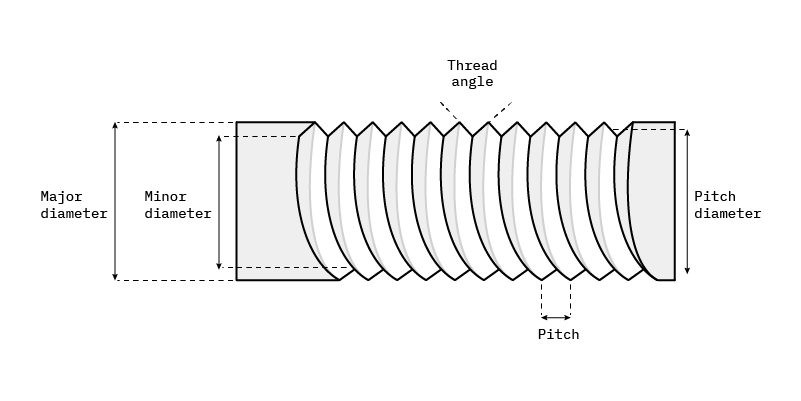
The thread profiles in a series, such as UN and Metric, consist of different thread types like UNC and UNF for UN, and M and MJ for Metric. The nominal diameter, major diameter, and thread size indicate the size of the thread, specifically referring to the major diameter. Pitch refers to the distance a point moves parallel to the axis in one revolution, while depth indicates how deep a thread is cut into a hole, whether it is thru or blind. Allowances are the allowable tolerances of a thread fit. Class fit, tolerance, and allowance define the tolerance range of thread dimensions, covering major, minor, and pitch diameters for internally or externally threaded parts.We suggest using standard drill sizes, as custom tooling costs a fair amount extra and adds to the production time.
What are blind holes and through holes?
thread
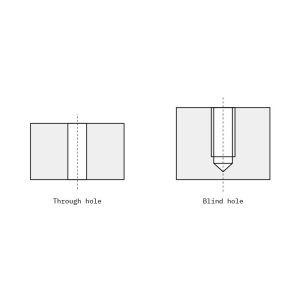
When cutting a thread, it is important to take into account whether you are drilling a blind hole or a through hole. Blind holes do not extend completely through the part, requiring you to indicate their depth. On the other hand, a through hole goes entirely through the surface of the component, with its depth corresponding to the thickness of the wall it penetrates.
What are the different thread types?
cutting a thread
When cutting a thread, it is important to take into account whether you need to drill a blind hole or a through hole. Blind holes do not extend completely through the part, therefore their depth must be specified. On the other hand, a through hole goes entirely through the surface of the component. Its depth will correspond to the thickness of the wall it penetrates.
Various thread types are available for selection, with metric and unified being the most prevalent. Allow us to analyze the distinct thread varieties in detail.
Metric threads are threads that adhere to the metric international standard set by ISO. They are widely used and considered to be one of the most common types of threads.
Unified threads, on the other hand, follow the imperial standard and are denoted by abbreviations such as UNC, UNF, UN, and UNEF. These threads can be categorized into coarse (UNC) and fine (UNF) threads. The UN designation is used for a specific series of threads that have a uniform or constant number of threads per inch.
Pipe threads
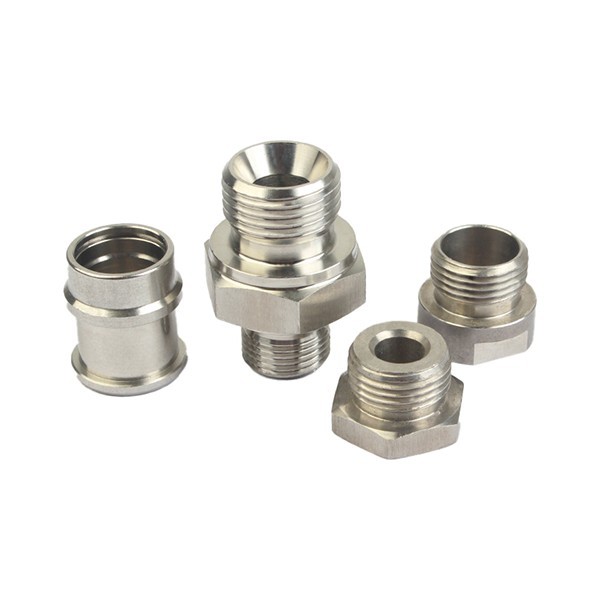
Pipe threads, also known as National pipe threads, are commonly used for threaded pipe fittings. They are denoted by abbreviations such as NPT, NPS, and NPTF. These threads are specifically designed for use with pipe fittings.
Multi-start threads are threads that consist of two or more intertwined threads running parallel to each other. This design allows for increased efficiency and faster movement in certain applications.
British Standard Pipe (BSPT) threads are another type of threads commonly used for threaded pipe fittings. They are similar to pipe threads and serve the same purpose.
Thorlabs, a brand specializing in optical equipment, offers their own branded threads for creating adaptors. These threads are specifically designed to be compatible with Thorlabs’ optical equipment.
ACME threads, on the other hand, are a type of trapezoidal thread. They have a specific shape that allows for efficient transmission of motion and are commonly used in various applications.
What is the method for identifying metric and UN threads?
external threads
What are the recommended tolerances for internal and external threads?The basic threads described are easily comprehensible by suppliers at both local and global levels. It is important to place the dimensions on the view that best showcases the feature.
Metric threads
define metric threads
You can easily define metric threads by specifying the type and size (e.g. M10) as a standard practice. The size is determined by the nominal diameter (major diameter) of the thread, as mentioned earlier. The pitch and depth will adhere to the commonly accepted metric standards. It is important to always indicate the depths for blind holes.
Class fit for metric threads
Internal thread tolerances
The tolerance of the threads, known as class fit, is also referred to as “allowance” or “thread fit.” Internal thread tolerances are always indicated with capital letters, while external threads are written in lowercase. The standard tolerances for threads are 6H for internal threads and 6g for external threads. These are the default tolerances that your supplier will follow unless you specify different tolerances in your drawing.
The class fits are commonly determined by ISO 965-1, taking into account the thread engagement length. This length represents the extent of your assembly and proves valuable in load-bearing calculations, as friction varies with the thread engagement.
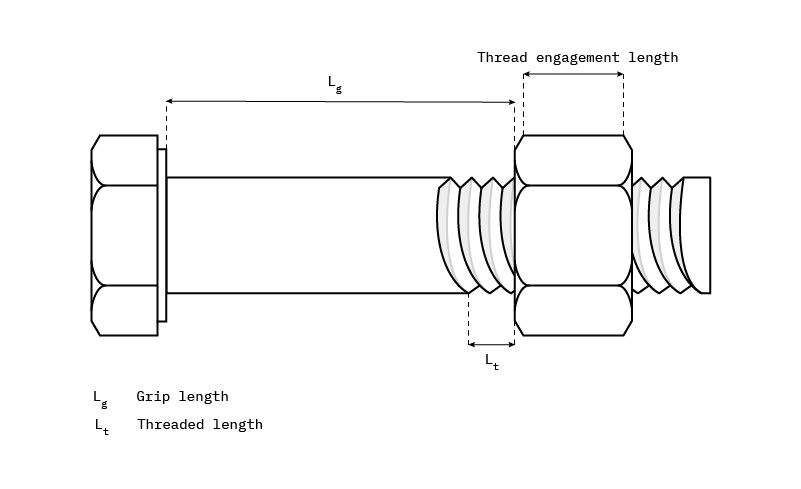
The standard length of thread engagement taken into account is N, representing a common screw/screw hole connection. Consequently, the default class is set to “medium,” which corresponds to 6H for internal threads and 6g for external threads, as indicated below.
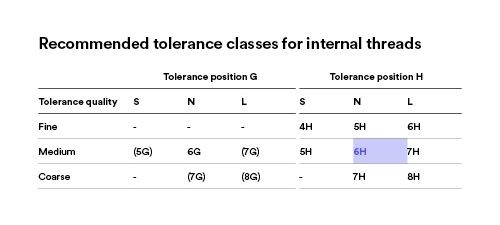

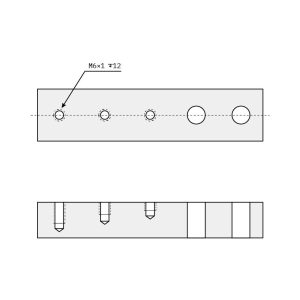
The position of tolerance
The position of tolerance determines the specific type of tolerance that should be employed. The primary options include G/g and H/h.
The tolerance changing with pitch diameter is defined by G (internal) or g (external) tolerances, whereas the static tolerance that remains constant regardless of the pitch diameter is defined by H (internal) or h (external) tolerances.
Occasionally, there might arise a requirement for a single thread to be designated by both internal and external threads.This signifies a fitting for an assembly, such as:
6H/6g
Metric threads in practice
Standard ISO thread: M10 x 1.5 – 6H THRU LH
Standard ISO thread: M10
When using metric threads, a straightforward call-out can suffice, such as in the second instance, where you simply specify the thread series (M) and size (10). In such situations, the remaining details will automatically default to standard. It is important
What are unified (UN) threads?
Class fit
Class fit – Unified threads (UN)
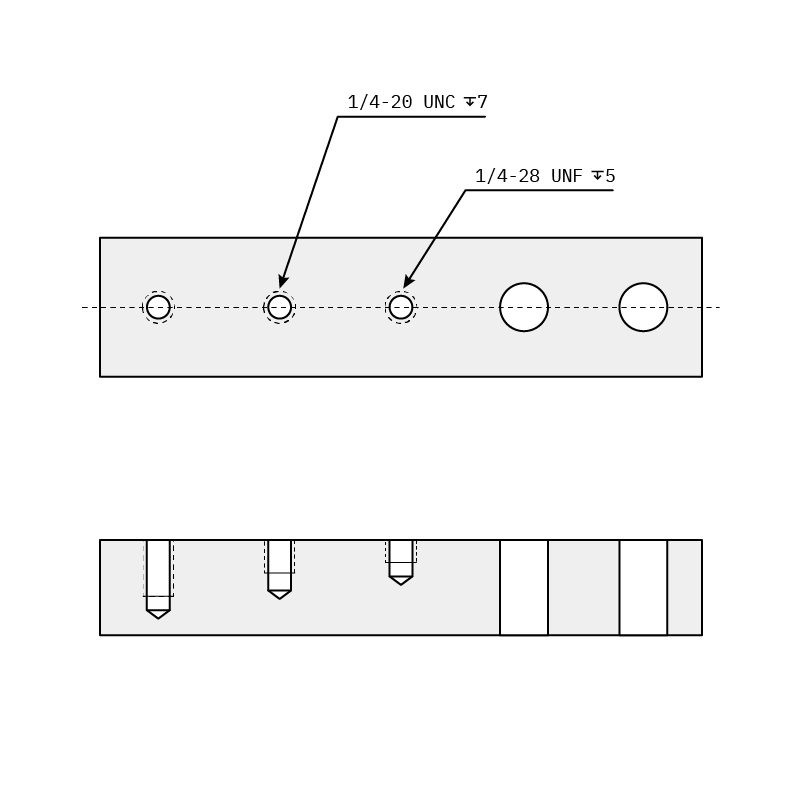
It is important to keep in mind that the class fit determines the tolerance range of thread dimensions, and this is always specified along with whether the thread is external (B) or internal (A). There are a total of 6 class fit types for unified threads.
Classes 1A and 1B are characterized by the loosest tolerance, which is quite uncommon. These classes are typically employed when there is a need for swift assembly or disassembly.
Classes 2A and 2B, on the other hand, exhibit a “medium” tolerance and are the most frequently used fit. This option strikes the best balance between thread performance and convenience.
Lastly, Classes 3A and 3B are known for their very tight tolerance. They are utilized when the threads play a crucial role in ensuring the safety and reliability of the final product’s service.
In the absence of a specified fit, the standard class fit for internal threads is 2A, while for external threads it is 2B.
Unified threads in practice
How can you optimize thread design to enhance manufacturing efficiency?
Keep it industry standard
Using industry standards for threading can greatly save time and money during the manufacturing process. If there is an available off-the-shelf solution, there is no need to unnecessarily complicate things. It is advisable to utilize standard thread types and series to the maximum extent possible.
It is important to consider that certain threads like NPT, BSP, etc. Overseas suppliers may encounter challenges with locally widely used products unless they possess specialized expertise. It is recommended to consistently opt for design options that increase the range of manufacturers capable of supplying them. By doing so, we can ensure that your designs are compatible with a larger group of manufacturers.
- Common series include UN (specifically UNC and UNF) and Metric (specifically M).
- Common sizes: UN list, Metric list
Be wary of hole sizes
It is a frequent error we have observed in our manufacturing process, where the thread sizes of the parts do not align with the designated hole sizes.
This issue is problematic as it causes uncertainty regarding the correct thread size and hole diameter. As manufacturers, we must avoid making assumptions, and this uncertainty results in a manufacturing delay of at least 1-2 days.
Call out thread depths on blind holes
An additional factor contributing to production delays is the lack of comprehensive thread specifications.
Blind holes are holes that do not extend through the entire wall thickness of the component. When specifying a thread in a blind hole,It is crucial to consistently indicate the thread depth when specifying a thread in a blind hole.
